
A few requests on how I made the large flower in my previous card. This would be sooo...much easier if I have a camcorder..LOL, but since I don't here goes...

Not sure what to call the flower, but wrinkled flower is as good as any, I guess...LOL.
Materials:
white cardstock
flower dies/punches (preferably 5/6 petals)
distress ink pad and dabber
spray bottle filled with water
1/8-inch circle hand punch
piercing tool
medium size brad
half pearl
The paper I used is my basic white cardstock that I used for my cards, AC Cardstock 80 lb.--I think this is similar to your Bazzill cardstock.
You need some kind of flower dies or punches. Doesn't matter which one as long a you have a succession of 4 different sizes. I used Crealis Creative Flower No. 06 dies. A few other that comes to mind are the Spellbinders Rose Creations dies, Spellbinders Posy Patch dies, EK Success Retro Flower punches. You only need one of each size, but if you want a fuller flower, you can include more layers.

With your distress ink pad (any colour you want) and dabber, dab some ink in the centre of each flower. (I made my own dabber by wrapping a makeup sponge around a piece of dowel and tied it in place with a string--ingeneous, eh? LOL)

Stack the flowers together and punch a hole in the centre with your hand punch, or you can pierce a hole with your piercing tool.

Push the brad through the hole and secure the brad. Arrange the layers so the petals are staggered.

By spraying water from your spray bottle, dampen the flower enough so you can see the colour from the ink start to spread/bleed. I think I sprayed 3 spritzes at the back, 3 on the front and a few more between the 2nd and 3rd layers.

Starting with the smallest flower, bring the petals up around the brad. I used my piercing tool for this one. Do the same with the other layers. And then scrunch/squeeze them together as shown below. Squeezing it tightly will give you the wrinkles and will further spread the ink.


With your piercing tool uncurl the petals one by one.

Shape the flower the way you want it to look when dry, eg. spread the petals if they are too scrunched up, curl the ends up a bit, etc. Let dry completely--this will take a while.

When completely dry, remove the brad. Glue the layers together.

Place a large half pearl in the centre as your flower centre. You can use other type of flower centres or even just leave the brad in place.

And voila! You're done!!!
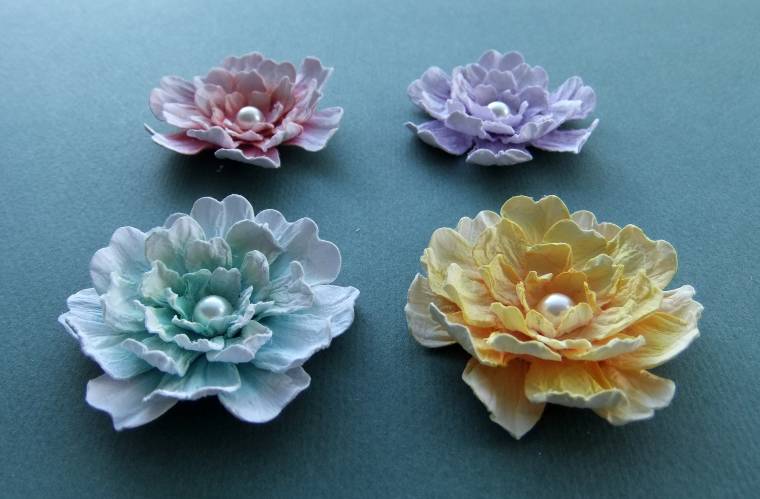
Here are pictures of some flowers using different distress ink colours, different dies and different numbers of petals. For the flowers at the top I used 4 petals. The flowers at the bottom are fuller and for those I used 2 layers of the largest-size petals.
Using the Crealis Creative Flower No. 06 dies...
 |
| colored in aged mahogany, dusty concord, pine needles, wild honey |
Using the Spellbinders Rose Creations dies...
 |
| colored in victorian velvet, broken china |
Using the Spellbinders Posy Patch dies...
 |
| colored in barn door, rusty hinge |
Happy creating!

55 comments:
What a fabulous tutorial!
Thank you thank you Norma! All these flowers are gorgeous and you make me want to put in an order for aaalll those dies. Love your technique and I am definately going to try making these. And I'm pinning to pinterest! ;) Thanks Norma! hugs, Angela
Fab tutorial Norma,I've never tried spritzing to blend out the colours,in fact I've only ever coloured the edges of my petals,will definitely give this a go! Thank you for sharing! X
Fantastic tutorial - thank you so much, the flowers are gorgeous xx
Norma, thank you so much for sharing your tips on handmade flowers! I've admired them on your cards for a while, and very grateful for the tutorial! Will be trying your technique shortly! Thanks again!!!
OMG Norma, this is just fantastic, so very beautiful. thank you for sharing... thank God I found my fingers back and I can type, and tell you about it LOL. I simply adore them!!!!!!have a nice day. Hugs.
Beautiful flowers and awesome tutorial Norma. Can't wait to try them out :-)
Hugs,
Cabio
These are absolutely stunning Norma!! Thank you! xo
WONDERFUL tutorial, Norma! Great step by step pics and thanks also for showing the different dies you used. These flowers are beautiful and I can't wait to try them after I order my dies. I was just going to order my flowers from you! Just kidding! But at least I can see the different styles by the dies you've used. I know it took at lot of time to put this together, so thank you very much Norma!
Hugs,
Cami
wow... Thank you very much for your great tutorial !
Stunning flowers Norma, thanks so much for your fantastic tutorial.
Hugs Cheryl
wow, what fantastic flowers, looks great!!!
Thabnks for the workshop
LG
Michaela
Thank you so much for taking the time to create a fabulous tutorial. The flowers are absolutely gorgeous. Can't wait to try it.
Have a lovely day.
Hugs, Janine xx
Hi Norma,
Thank you so much for the workshop. I'm going to really try them out
Frouwkje xxx
thank you Norma! these are gorgeous! guess what im doing very soon? lol!!!
Gorgeous flowers! Thanks so much for the tutorial!
Wonderful tutorial, Norma, Thanks for sharing, Going to try this on the weekend, hugs, Frances
Norma,
Thank you so much for this tutorial! You're flowers are always so pretty. I love the fact that you showed us how to make our own ink dauber from a makeup sponge.
♥ Laura C.
This is absolutely brilliant Norma, Thanks so much for the awesome tutorial, love your flowers
Hugs julie P
Hi Norma, Thank you for the wonderful tutorial!! Before I even read your posting, I saw the dabber you had made and thought where did Norma find that from. I'm going to have to try to make some of the dabber and the beautiful flowers!! Have a wonderful weekend!
Hugs,
Suzan
These are beautiful. I really must try them. Thanks for sharing.
Do you have a source for the Crealis creative flower no 06 die? Somewhere in Canada or the States???
OMG LOVE YA FOR SHARING YOUR GORGEOUS FLOWER DEMOS!!!
Ruby
OMG !!they are crazily beautiful !!
absolutely brill thanks for sharing your tips and skills love the dauber idea I will hopeful get to try them out a Xmas as I know Santa is
bringing me me a grand calibur for christmas(hubby got it yesterday at C+C) teehee ,...i cant wait !!
thank you
x
WOW!!!! Such a FAB tutorial. Thank you so much
Sue
what a fabulous tutorial! thank you so much!
xx
Thank you so much, you make it look so easy...I am definitely going to gather up my courage and give this a try...thank you!
Beautiful flowers, I must try to make that kind of flowers. Thanks for sharing :)
How awesome! I need to try this now. Very beautiful.
Really lovely idea. Will certainly have to give this one a try. Your cards are beautiful.
Gorgeous flowers thank you x
lovely tute ..outcome is awesome
Hello, I was just doing blog surfing, and found your tutorial.
This is what I wanted to learn !!!
What a WONDERFUL, BEAUTIFUL flowers !!!
Thank you for sharing !!! (^o^)/"""
Wow!! I bought the grand spellbinder set because I am making so many flowers for the bridal shower and wanted more variety. But I have to admit, I have never seen them look so good!!! Love the idea of spritzing with water!! Really makes them look amazing!!
Thanks bunches for more ideas on getting different looks of flowers!
Your amazing
Jackie P
Thanks for sharing this. The flowers are beautiful. I'm going to try this without a doubt. Brilliant !!
Jo xx
What a wonderful tutorial! Thank you for sharing, Norma!
Fantastic flowers Norma, you're tutorial is wonderful, thank you so much, Cathy x
Thank you for sharing this. Great idea and easy to follow.
so so so pretty!!!!!!!!
thanks for a fab tutorial!
thanks for a great tutorial your flowers are gorgeous
Who needs a camcorder? Wonderful tutorial. Beautiful beautiful flowers!
Thank you so much for sharing! Your flower technique and ingenious homemade dabber will certainly be used in my craftroom.
I am so going to try this Norma. Off to the make up isle too! Thank you for sharing.
only distress ink can be used or anyother inkpad will also work..
How gorgeous, and what beautiful flowers!
Hi Norma, just found this post on Pinterest. How wonderful to find a straight forward tutorial with such a fabulous result. TFS....Brisbane, Australia.
I've always admired your fabulous flower Norma, this tutorial is fabulous! Thank you so much for sharing it. Hugs, Wends xoxo
Muchas gracias Norma, muy bien explicado el tutorial, amo las flores, estàn bellísimas, saludos desde Costa Rica..
Norma, loved the flower tutorial. Planning on trying your lead and crafting some flowers. Wish me luck.
so beautiful it is !
thank you so much -looks so easy yet beautiful outcome! will definitely give it a go!
Judy
Thank you for the detailed tutorial.
A great tutorial thats so easy to follow! Im going to try this today! Many thanks!
Post a Comment